Merry Christmas to y'all. We hope your next few days are filled with wonderful memories and joy.
See you next week,
Amy & Katie

Friday, December 24, 2010
Wednesday, December 22, 2010
Crafty gift idea
My sister called me today to tell me that she got our 3 year old the same gift as his Aunt bought him. A huge bucket of farm animals! What should we do?
 He loves farm animals ... will he know they are the same if they are in a different box? Probably not.
Solution: Get a rubbermaid box with a lid, paint pen a cow or horse and his name on top. Wrap the box. Now he will have a huge tub to put both buckets of animals in!
Amy

Solution: Get a rubbermaid box with a lid, paint pen a cow or horse and his name on top. Wrap the box. Now he will have a huge tub to put both buckets of animals in!
Amy
Monday, December 20, 2010
Christmas Ball Wreath
This is SO easy ... AND I saw it on The Today Show and thought, I can totally make that!
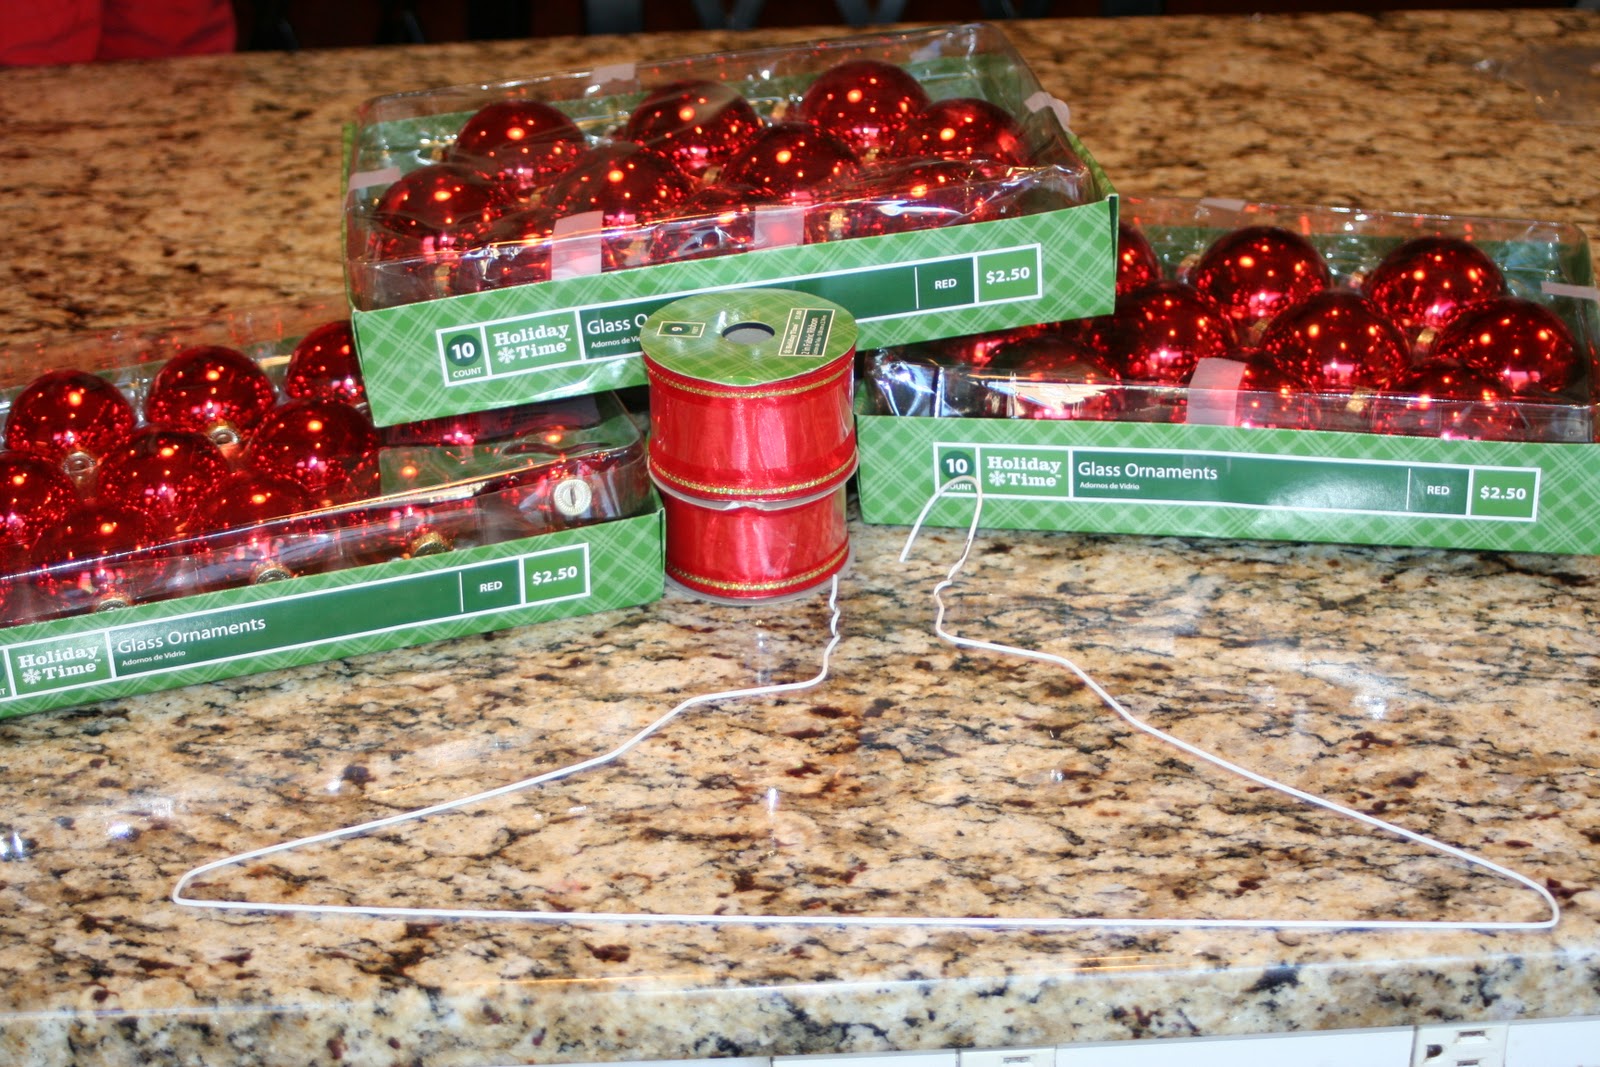
Supplies:
One wire coat hanger
4 packs of Christmas balls in various sizes ($2.50 each @ Wal Mart - I bought 3, but had to get 1 more)
2 rolls of ribbon ($1 each @ Wal Mart)
Glue gun (I found out the hard way that I needed this!)
Follow the pictures! So simple my kids helped!


 I found this out the hard way ... BEFORE you start putting the balls on the wire hanger ... put a little hot glue on the silver ball hanger to keep it attached to the ball. Otherwise, when they start piling up on the wire, some of them may decide to fall off! Yikes!

 Tie the coat hanger in a twist so it can hang on a nail.
 Make a bow. If you need a Bow tutorial ... Get a bread tie ready before you start. Make a loop of ribbon on each side 4 times at various lengths and tie it in the middle with your bread tie. Once it is assembled, you can fluff your bow to make it look pretty. Use a lot of ribbon ... more is ALWAYS better on a bow. A ribbon with a little bit of wire in the edge makes it easier to fluff.
 I put 3 tiny glass balls on a bread tie to tie my bow. Crafty!:)
 Tie your bow and make a loop with your wire. I looped a rubber band on the wire to hang it on a nail above my window.


 So cute ... honestly ... I did not hot glue my hangers to the balls. I wish I had because 6 fell off trying to hang this on the window! Then it took me forever to find where the balls go in the stack. Since it was placed here, above my kitchen sink, my son and I have made a bet: How many balls will fall off BEFORE Christmas? His bet:10 ... my bet: 6.
TOTAL SO FAR = 4. Hot glue them!
HO HO HO!!!
Amy
Supplies:
One wire coat hanger
4 packs of Christmas balls in various sizes ($2.50 each @ Wal Mart - I bought 3, but had to get 1 more)
2 rolls of ribbon ($1 each @ Wal Mart)
Glue gun (I found out the hard way that I needed this!)
Follow the pictures! So simple my kids helped!


TOTAL SO FAR = 4. Hot glue them!
HO HO HO!!!
Amy
Labels:
Christmas,
Crafty,
Decorating


Thursday, December 16, 2010
Hip Hop Christmas?!
Merry Christmas from my 4 little boys ... this cracks me up! We do this as our Christmas card every year and the dances keep getting funnier. It is fun and cost effective!
http://elfyourself.jibjab.com/view/9PxGtLW5C98MHal6a3T3
Go make one for your family! Enjoy the next 9 days.
Amy
http://elfyourself.jibjab.com/view/9PxGtLW5C98MHal6a3T3
Go make one for your family! Enjoy the next 9 days.
Amy
Tuesday, December 14, 2010
Christmas!
11 days until Christmas! Where did December go???
After having zero internet all weekend, I was unable to do a post and more importantly SHOP ONLINE! With that said, I’ve borrowed my neighbors wifi tonight and am happily doing a post ordering Christmas gifts. Ahhh… how did we operate before Internet? And thank you to my lovely neighbor Rosa for sharing her wifi. :)
After having zero internet all weekend, I was unable to do a post and more importantly SHOP ONLINE! With that said, I’ve borrowed my neighbors wifi tonight and am happily doing a post ordering Christmas gifts. Ahhh… how did we operate before Internet? And thank you to my lovely neighbor Rosa for sharing her wifi. :)
In the last week and a half, we’ve done all our decorating and it’s hard to believe we’re half way through December already. Here are a few pictures of Christmas decor and ideas...

Simple. That's my theme this year. This garland is
oh so fab and Homegoods hit a home run on this one.


My hubby's childhood ornament and his favorite to date!


Found this garland at Michaels and love it!

Took some of our beautiful serving trays and doctored them up with ornaments and berrys

Ahhh... love this season! Hope everyone is having a wonderful holiday!
Katie
Thursday, December 9, 2010
Christmas Decor
I saw this in a magazine or on a blog but cannot remember where and it's driving me nuts! I think it was Pottery barn but for the life of me I can’t find it online. Regardless, this is totally not my idea but I couldn’t wait to do this project. A few tree branches, a little spray paint and a trip to the dollar store made this project a total of $2 and it's so cute for Christmas!
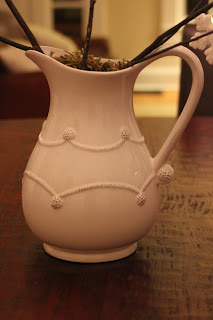


I started with this pitcher which I adore. Love Jalisco

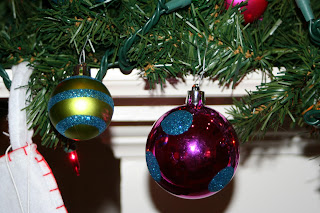
These ornaments came from Dollar Tree and have just the right bit of sparkle!
A bag of moss from Dollar Tree

So cute!


A last minute decision to paint the branches white, and much better!
Hope everyone is finding joy in the holiday season! Posting our mantle tomorrow and Amy and I are doing a dual wreath post on Saturday so be sure to visit. Thanks for staying tuned!
Katie
Tuesday, December 7, 2010
Jackets & Stuff
I know I cannot be the ONLY one in this world who struggles with stuff. Stuff that is ALL. OVER. THE. HOUSE. The minute we walk in the house, shoes are tossed around, jackets flung on the couch, backpacks and purses everywhere... It's sheer chaos. Our couch, dining room table and kitchen island serve as a dumping ground for all things outerwear related. Makes me bonzo. With the freezing cold weather this weekend (for Atlanta it’s INSANE cold!) and excessive outerwear explosion, I decided that enough is enough and finally made a hall hanging station for all of our “stuff!”
Does this look familiar to anyone?

Jackets

More Jackets. A shoe. a baby toy. A backpack underneath this pile. Gasp!
Our empty hall/stairway is begging for some organization! Bring me stuff!

Poor umbrella needs a home. And the Ryobi sander.. Is this really where you should live? Maybe that's part of a cool mist humidifier. What have I become?!
I bought this Walmart hanging rack for $10. I had a few extra blue baskets from the baby's nursery and this silver bucket we had was perfect for storing winter hats and gloves!


Ahhhhh!!! Look! Shoes and backpacks and jackets, oh my!

How good does it feel to get organized? I swear I slept better last night after tackling this project and clearing the clutter!
Hope this inspires you to tackle your Jackets & Stuff!
Stay tuned for tomorrow’s Christmas post with my Pottery Barn-ish tree limb project!
Stay tuned for tomorrow’s Christmas post with my Pottery Barn-ish tree limb project!
Katie
Labels:
Organization
Saturday, December 4, 2010
Is Your Table Festive?!
Let's make your table festive ...
Like I said in the mantle post from Thursday, decorate your tree first. Put all of the extra things in a pile!


Happy Holidays!
Amy
Labels:
Christmas,
Decorating
Thursday, December 2, 2010
Christmas Mantle easy as pie!
Happy Holidays Crafties! This is my absolute fav time of year. L.O.V.E. to decorate the house and burn those yummy Christmas candles all day long! (Not to mention eating all of the cookies ... sigh)
So let's make a mantle ... easy a pie.
Decorate the tree FIRST. Put everything you have left in a pile. Get some garland. It makes everything look better (and it looks like you spent a lot on decor).
Find 2 things to go on the end of your mantle with some height. A small tree, an angel, a candlestick ... anything you can find in your cabinets.
 My Mom gave me these 4' tall Santa statues that are really great. Thx Mom. :)
 These are my left over ornaments and colorful lights ... I try to do a different mantle each year. I used these balls and lights outside on my wreath and topiaries last year. I can't do that again! It is like wearing the same outfit to the same party for the second year in a row. Nah.

 I got these reindeer last year at Target ... love them! Have no idea where I got the silver trees ... have had them forever. I like the all silver combo.
 Place the garland on your mantle. Put something with height on the ends. Put some lights on your garland. Start inserting your extra decorations.
 BEST SECRET .. I have a lot of those cute little stocking holders that sit on the ledge and hold your stockings. However, I have 4 little boys ... enough said. THUMB TACKS!!! Thumb tack your stocking to the mantle. Hide it in the garland. Works like a charm. :)
 These stockings were cute and had nowhere to put a name on it ... so I attached a Santa hat gift tag on each stocking with our names on each.
 I stepped back and looked at the mantle ... hmmmm .... it needs a little "umph." Balls! I forgot the balls!

 Finished product! Pretty snazzy. Now, post your comments or your ideas below and let us know what you did to decorate your mantle easy as pie. Good luck and get crafty!
Amy
So let's make a mantle ... easy a pie.
Decorate the tree FIRST. Put everything you have left in a pile. Get some garland. It makes everything look better (and it looks like you spent a lot on decor).
Find 2 things to go on the end of your mantle with some height. A small tree, an angel, a candlestick ... anything you can find in your cabinets.


Amy
Labels:
Christmas,
Decorating
Tuesday, November 30, 2010
I Love My Silhouette!
After a wonderful Thanksgiving (‘ful’ like, I’m so full from Thanksgiving I had to find a project I could do sitting down), it was fun to start thinking about Christmas and tackle the first project of the season! Yeah, so maybe we ate ourselves into oblivion for 3 days but it was SO worth it! I hope all of you had awesome weekends with friends and family, food and laughter and all that really matters! We sure did.
Today was my Silhouette’s maiden voyage and it was such fun! Love her! Tons of projects are lining up in my head and I can’t WAIT to use this clever little tool again. After seeing Thrifty Décor Chick’s “Give Thanks” letters and also My Uncommon Slice of Suburbia’s, I really wanted a lovely Christmas message to create with the Silhouette. Did I mention I love this thing? Thank you my dear in-laws for making my dorky craft dreams come true!
A quick trip to Michael's today and $7 later, an array of cute paper choices lined up our dining room table. I picked a great black & white damask pattern,
red and white stripes and a linen steel blue.

Made my design in the software and then started cutting!


I organized my piles of cut paper, then laid out my design

I used a hole punch at the top of each letter and used some string we had to string up all the letters together. I hung them in one of the dining room windows (p.s. I love blue).

Now I just need a little garland and some more Christmas decorations to complete the window. All in all, the Silhouette proved to be a rock star in the paper cutting arena.

Katie
Labels:
Christmas,
Silhouette
Subscribe to:
Posts (Atom)